In the previous part of this series, we discussed how to build a docker image and used it to run Madagascar programs locally. In this section, we’ll extend on that to run Madagascar programs on Amazon Web Services, specifically using AWS Fargate, creating a so-called serverless deployment. Although the process we’ll run is pretty trivial (just making a jpeg image), hopefully, it will serve its purpose in providing instruction and a general template as to how cloud systems can be used to perform seismic data processing. For example, I recently used a very similar procedure to create a searchable index for a 10TB SEGY dataset.
As with part 1, the target audience for this post is geophysicists who want to get started with remote service deployment, but even if you are not a complete computer geek I would invite you to give this article a try. I will try to avoid specialized content and keep this as simple as possible. That said, for the sake of brevity, I will need to assume familiarity with the concepts and material in the first part of the tutorial in some places. So, if you are new to Docker I would encourage you to have a look at that post first.
It is basically divided into two parts in the first section we’ll summarize the steps to get set up with Amazon Web Services (AWS). If you are already familiar and have your own set up you might just skim this section. Then in section 2 we discuss deploying the image on AWS Fargate.
Setting up to work with AWS
A quick word on AWS
If you are not familiar with AWS, then beware, the learning curve is extremely steep and Amazon does not make this any easier by having an insane number of different (and often overlapping) service offerings. That said once you climb up the curve the system provides a lot of scalability and flexibility.
The main services we’ll be dealing with are:
- IAM – This configures user and process and authentication on AWS services
- S3 – Amazon’s large data storage service
- ECS (or Ec2 Elastic Container Service)- which is used to manage container workloads (we’ll be using AWS Fargate which is a subset of ECS)
In the guide below I will try to go through things from first principles, however, there are much more comprehensive guides out there (I have linked to several of them). So if you have no familiarity with the above then it is probably worthwhile reading up on AWS usage and in particular these services as you follow along.
The following resources may also prove useful:
- https://www.expeditedssl.com/aws-in-plain-english – provides a nice glossary of the different AWS services
- https://medium.com/xeco-labs/aws-ecs-in-simple-words-9e083e3ec2ee – describes the different components of running processes on ECS.
- https://medium.com/boltops/gentle-introduction-to-how-aws-ecs-works-with-example-tutorial-cea3d27ce63d – describes how to set up and run an ECS process. Most of the steps in this tutorial are handled automatically by the automated tool we’ll use (FargateCLI), but it might still be worth being familiar with the different concepts.
Creating a new AWS Account
Unsurprisingly you will need an AWS account in order to run the remote services on AWS.
- Go to https://aws.amazon.com/ – and click sign up
- You’ll have to go through a few steps providing an email address etc.
- You will also have to put in payment card information at some stage. However, if you are just getting started don’t worry too much. At the time of writing Amazon provides a relatively generous free-tier and the material in this tutorial should incur a negligible cost. For example, when I tested it I was not charged at all.
- When it asks you about support plans just go for the free option
Once this is all done you should be able to sign into the AWS console using your email and password at https://aws.amazon.com/console/. This is effectively your root user for the AWS system.
Creating your first IAM user
In the previous section, you effectively created a root account on the AWS system. However, for a variety of reasons (including security), it is probably not a good idea to run tasks and access services using the root credentials (for that same reason you don’t run all processes on your PC as root). So our first task is going to be to create a user with very broad (but not root) privileges. To do this we’ll be following the instructions set out in this guide.
- Sign into the console if you have not already done so – https://aws.amazon.com/console/
- Go to the IAM section

- Go to Users -> Add user and go through the forms giving your user a name etc.
- The user will require programmatic access (so they can use command line tools etc). I also allowed them console access, but you might be able to get away without allowing this.

- Next on the Permissions section
- Add user to group -> Create group
- Filter policies -> AWS Managed job Function

-
- And select Administrator Access

- Now click Create the group
- Once the group is created it takes you back to complete the user creation forms and you can click through to create the user.
- At the end of user creation, it will supply you with the user authentication details. Save these details and or download the CSV as we will need them later.

Congratulations you have now created an Administrator user.
Allowing your user access to ECS
As mentioned above AWS Fargate is a subset of ECS (or Ec2 Elastic Container Service) which is Amazon’s service for managing and running container services. However, by default IAM users do not access to ECS resources (even Administrators apparently). So we need to add some ECS permissions to our recently created user.
- Sign into the console (as root) if you have not already done so – https://aws.amazon.com/console/
- Select the IAM section
- Select the user you created and select add permissions

- Select attach existing policies directly

- Select AmazonECS_FULLAccess (use the search to find it if necessary). This provides access to everything in ECS for our user. We could provide more selective access, but for the sake of simplicity, we’re going to use general permissions here.
Setting up the command line tools
The AWS console provides sufficient functionality for setting up and running tasks. However, for simplicity, repeatability the command line is probably a better option. Fortunately, Amazon also provides a pretty rich set of command tools which we will use and augment with an open source application in order to run tasks.
Installing AWS CLI
Details of how to install the tools depend on what sort of system you are running, and you should consult here for details.
My system is running Ubuntu 18.04 server with python and python-pip installed. In which case you can just run
pip3 install awscli --upgrade --userYou also might need to make sure you add the AWS executables to your command path. This is particularly the case if you have decided to install using the –user option as above.
export PATH=${PATH}:${HOME}/.local/binFor details see here.
Configuring AWS CLI
Assuming you have your the AWS CLI installed and the user credentials available (remember we created these earlier), configuration is very straight forward
# aws configure
AWS Access Key ID [None]: ??????
AWS Secret Access Key [None]: ??????
Default region name [None]:
Default output format [None]:
This essentially creates the file ~/.aws/credentials which is used to store authentication information and settings
Create an S3 bucket
S3 is one of the cloud data storage solutions from Amazon. We are going to use this service to provide inputs and save outputs from the running container. This is necessary because Docker containers have no persistence. That is, they destroy all their data when they finish executing.
Fortunately, creating an s3 bucket is pretty straight forward:
- Sign into the AWS console (using either root or your IAM user) and navigate to the S3 service https://console.aws.amazon.com/s3
- Create a new bucket and optionally a folder in that bucket.
Keep a note of the bucket name as we need it in the next section. In our case the bucket name is motionsignaltechnologies-madagascar-tutorial.
Set the permissions for the S3 bucket
If you created a public S3 bucket then you can skip this step. However, the more common use case is that you will want the S3 bucket to be private and probably only accessible by you. So we need to add some permissions which will allow the instance running on AWS’s servers to access the S3 bucket. The easiest way to do this is to add an inline policy to ecsTaskExecutionRole.
- Sign into the console (as root or the adminstrator user we created above) if you have not already done so – https://aws.amazon.com/console/
- Go to the IAM section https://console.aws.amazon.com/iam
- Go to Roles
- Locate ecsTaskExecutionRole (note -if this is not visible it might be because you only recently configured ECS access for this user, try refreshing and or waiting a afew minutes for AWS to get everything together)
- Click add inline policy
- Using the JSON tab add the following
{
  "Version": "2012-10-17",
  "Statement": [
    {
      "Effect": "Allow",
      "Action": [
        "s3:ListBucket",
        "s3:GetBucketLocation"
      ],
     "Resource":
     "arn:aws:s3:::motionsignaltechnologies-madagascar-tutorial"
   },
   {
     "Effect": "Allow",
     "Action": [
       "s3:GetObject",
       "s3:PutObject",
       "s3:DeleteObject"
     ],
     "Resource":
     "arn:aws:s3:::motionsignaltechnologies-madagascar-tutorial/*"
    }
  ]
}
Where you need to replace motionsignaltechnologies-madagascar-tutorial with whatever you called your bucket.
If you have configured access correctly (and the command line tools are configured) then the following command should work
# aws s3 ls motionsignaltechnologies-madagascar-tutorial-1That is, it should not throw any authentication errors. In fact it should provide no output at all because the bucket is empty.
Configuring the Task
Building the Image
We are going to use a slightly modified version of the image in part 1. But that is ok, because one of the good things about Docker images is that you can use an existing image as a base in order to construct derived images.
The Docker file for this tutorial is as follows:
FROM motionsignaltechnologies/madagascar-tutorial1:latest

###################################################################
# Install AWS CLI
###################################################################
RUN apt-get update && \
	apt-get install python-dev python-pip -y && \
	apt-get clean
RUN pip install awscli

####################################################################
# Configure run time
####################################################################
WORKDIR /tmp/workdir
ENTRYPOINT \
	aws s3 sync s3://${S3_DIR}  ./ && \
	bash -c "${EXECUTE_COMMAND}" && \
	aws s3 sync ./ s3://${S3_DIR}/
which is also available from github.
Looking in a bit more depth at the Dockerfile, the following line
FROM motionsignaltechnologies/madagascar-tutorial1:latestinstructs Docker to use the image from the previous post (which has Madagascar installed) as a base. While
RUN apt-get update && \
	apt-get install python-dev python-pip -y && \
	apt-get clean
RUN pip install awscli
installs the AWS CLI Tools in the image. We will use these to move data to and from storage. Finally the lines
WORKDIR /tmp/workdir
ENTRYPOINT \
	aws s3 sync s3://${S3_DIR}  ./ && \
	bash -c "${EXECUTE_COMMAND}" && \
	aws s3 sync ./ s3://${S3_DIR}/
describe the generic workflow the image will follow. ENTRYPOINT follows a fairly typical design pattern for running commands on cloud systems namely:
- The container is started
- Input data is copied from a permanent storage location (in this case an S3 bucket) to the running Docker container
- Commands are executed
- The contents of the working directory are synced back to the permanent storage location (the S3 bucket).
The usage of the environment variables S3_DIR and EXECUTE_COMMAND in the ENTRYPOINT command above allows the user to execute different commands and or read/write from/to different locations without needing to re-build the image.
The image is built using the following command:
docker build -t motionsignaltechnologies/madagascar-tutorial2:latest .To run the task remotely you will also need to create an image repository on docker hub and push the image using
docker push motionsignaltechnologies/madagascar-tutorial2:latestTest task deployment on the local machine
It is a bit inelegant but you can test run your image from your local machine, using docker run and providing your AWS security credentials via environment variables (using the -e option). For example:
docker run \
   -e S3_DIR=motionsignaltechnologies-madagascar-tutorial \
   -e EXECUTE_COMMAND="sfspike n1=1000 d1=0.004 o1=-2. k1=501 | sfbandpass fhi=2. phase=1 | sfgraph title='Welcome to Madagascar' | jpegpen > plot.jpg " \
   -e AWS_ACCESS_KEY_ID=????? \
   -e AWS_SECRET_ACCESS_KEY=???????? \
   -it motionsignaltechnologies/madagascar-tutorial2:latest
Where the values for AWS_ACCESS_KEY and AWS_SECRET_ACCESS_KEY can be obtained from your ~/.aws/credentials file assuming you have the command line tools set up. You will also need to replace motionsignaltechnologies-madagascar-tutorial with the correct name for your S3 bucket.
It should create a plot like this in your S3 bucket

Create and run the task remotely
Finally, we are ready to deploy the task remotely. We’ll do this using the FARGATE CLI tool ( http://somanymachines.com/fargate/). If you have not already done so you will need to install this. There are detailed instructions on the site and pre-built versions for most OS flavors, this is what I did for Ubuntu 18.04
wget https://github.com/jpignata/fargate/releases/download/v0.2.3/fargate-0.2.3-linux-amd64.zip
unzip fargate-0.2.3-linux-amd64.zip
which creates the executable fargate in the current directory.
Then to start the task use a command like:
./fargate task run madagascar \
-e S3_DIR=motionsignaltechnologies-madagascar-tutorial \
-e EXECUTE_COMMAND="sfspike n1=1000 d1=0.004 o1=-2. k1=501 | sfbandpass fhi=2. phase=1 | sfgraph title='Welcome to Madagascar' | jpegpen > plot-fargate.jpg " \
--task-role ecsTaskExecutionRole \
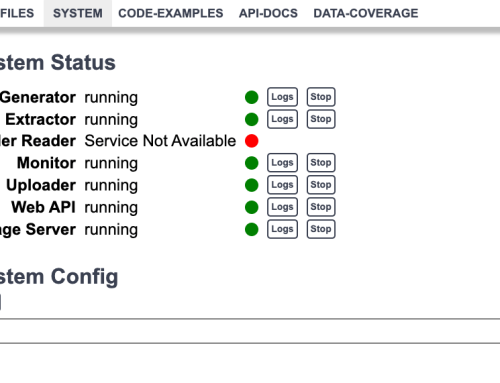
--image motionsignaltechnologies/madagascar-tutorial2:latestThe Fargate CLI is a really useful tool with a lot of functionality. For instance, you can list running tasks using
fargate task list
  NAME		INSTANCES
  madagascar	1
And get task details using
fargate task ps madagascar
ID					IMAGE							STATUS	RUNNING	IP		CPU	MEMORY
5d229aed-432f-49f5-97f1-0d23d55374b6	motionsignaltechnologies/madagascar-tutorial2:latest	pending	23s	34.204.202.142	256	512
Similarly, you can view task logs using
fargate task logs madagascarThere is a ton of other functionality which goes beyond our needs here (for instance ability to create services, load balancers etc.) and I would encourage you to explore in greater depth. The documentation on http://somanymachines.com/fargate/ is a good starting point.
A final word about permissions
If you have sharp eyes then you may well have noticed an important difference between the how we run our service remotely vs how we run it locally. Specifically, I am referring to the need to provide AWS_ACCESS_KEY and AWS_SECRET_ACCESS_KEY when running the command locally. These were required so that the docker container we running could authenticate to AWS and access the S3 bucket to download input data and upload results.
However, when running the remote service Fargate CLI authenticates to AWS for us in order to set up the task. The task then runs with it’s own set of permissions as defined by the ecsTaskExecutionRole. This might seem unnecessary in this example where you could just say I want my task to just run with my permissions. But it is designed for cases where you have multiple users and services started automatically (i.e. user clicks on a button on your site etc), it is also a good idea for security reasons to give tasks the minimum access they need. So since your task already has a set of pre-defined permissions all we need to do is add access to the S3 bucket to those permissions and the task has everything it needs to run.
Summary and further considerations
So that completes our two-part post where we
- Part 1:
- Built a docker image which contains the Madagascar seismic processing package
- Pushed the image to a remote repository on docker hub
- Ran the image locally
- Part 2:
- Signed up for AWS and configured our environment for remote execution
- Installed and configured the AWS command line tools
- Updated our image for remote execution specifically reading and writing from/to s3 storage
- Ran the image using AWS Fargate.
Needless to say, the content of this post was tailored specifically for AWS but hopefully I have explained the underlying principles sufficiently to allow you to apply the concepts in other cloud environments if necessary.
If you have followed both parts of the tutorial then you have probably realized that we have only scratched the surface here and much more sophisticated setups are possible including; python or scons execution, remote service interaction, automated service creation, and parallel deployments. I would also add that a careful review of the security and access requirements for the instance you deploy is a good idea in order to prevent any nasty surprises when deploying services such as those described here at scale.
If you want to find out more about these possibilities then feel free to get in touch. In the meantime, I hope you have found this article helpful and or a useful template to build upon.
Acknowledgments
As is always the case with this type of post, this functionality would not be possible without the open source communities which develop and maintain packages and tools like Madagascar and Fargate CLI. I also would like to thank Mateo Ravasi and Carlos Alberto da Costa Filho for their input on this post.


